This tutorial is intended to explain what RAM is and give some background on different memory technologies in order to help you identify the RAM in your PC. It will also discuss RAM speed and timing parameters to help you understand the specifications often quoted on vendors' websites. Its final aim is to assist you in upgrading your system by suggesting some tools and strategies to help you choose new RAM. It is written from the standpoint of a desktop PC owner but most of the concepts apply to laptops and notebooks as well. Like all PC components, RAM has gone through a number of evolutionary changes (and some revolutionary changes) and only the RAM designed for your computer will work in your computer. There are literally hundreds of different RAM products on the market today so it is important to know the correct type for your system. I am attempting to write this for the non-technical user but the further I get the more I descend into techno-babble so you may need to learn a few terms along the way. I'll assume familiarity with common terms like Megabytes and Gigabytes etc. Finally I should say I'm not a memory expert, some of the information here I came across in the process of writing this tutorial, but I hope you will get as much out of this exploration of RAM as I have.
WARNING - this tutorial may contain more than you ever wanted to know about PC memory!
The term 'RAM' is an acronym for Random Access Memory, this is the memory that your computer uses to run its operating system and any applications that you start. The name means that the computer can access information held anywhere (i.e. at a random location) in RAM by addressing that part of the RAM directly. In other words if there is some information stored in the 1000th location in memory the system does not have to read the information in the preceding 999 locations to get there, instead it can access the 1000th location simply by specifying it. The alternative would be called sequential access, an example of which would be accessing information stored on a hard drive - the drive can only read the information which is currently passing underneath the read/write heads, so if an application wants information in say sector 14 of a certain track the drive has no option but to read all the information on that track. The drive electronics then separates out the information from sector 14 and returns that to the application, the information from the rest of the track is discarded. So RAM is the quickest way of organising information for retrieval. Why not have everything on your computer stored on RAM? The answer is cost and volatility - RAM costs far more per GB than a hard drive and most RAM requires power to maintain the information stored in it (It's memory is "volatile"). If you had a RAM only computer you would have to reload the operating system and all your applications and data every time you switched off or there was a power cut. There are appropriate uses for this type of computer (e.g. thin clients) but generally a system is best served by a mix of RAM and Drive storage. Your computer needs different amounts of RAM for different tasks and the more applications you open the more RAM is required. You might think that sooner or later you will run out of RAM and then what? Well the operating system is designed to cope with that situation by 'paging' blocks of RAM to the Hard Drive. What that means is if the system is running out of RAM it takes the contents of a 'chunk' of RAM (usually the least used part) and writes it to a reserved area of the Hard Drive, called the Page File or Swap Space. The 'chunk' of RAM is then declared free for use. By using the swap space in this way the system normally never runs out of RAM. But as we have already discussed accessing information on the Hard Drive is inherently slower than accessing it from RAM so the result is the computer slows down. No-one likes a slow computer so what do you do about it? Obviously you want to add more RAM but to do this you need to match the additional RAM with what is already in your PC and you need to be sure your motherboard will support the kind of RAM you intend to use.
In "the beginning" RAM came in the form of semiconductor chips which were individually plugged, or soldered, into the motherboard. That made up the original 640KB of system memory that DOS hung onto for so long. Now memory comes in clip-in modules, usually called memory sticks (not to be confused with USB Flash drives which sometimes go by that name). Memory sticks or modules have changed format over the years as their capacity has increased. Here is a list of the main types, in rough order of increasing complexity, along with other terms used to describe them:
 A 30pin SIP module
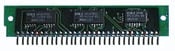
 A 30pin SIMM module
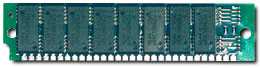
 A DIMM module *
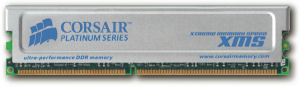 A DDR module with heatspreaders *
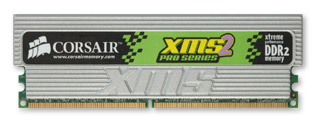 A DDR2 module with large heatspreaders *
- Pins - Originally the name for the "legs" on a memory module, similar to the legs (or lead) on an electronic chip. The terminology has carried over to describe the number of contacts on memory modules even when they are not pins.
- Bus - A group of electrical conductors linking different parts of the computer. Just as a bus in real life is a means of transporting large numbers of people from one location to another, so a bus in a computer is a means of transporting large numbers of signals (or data) from one integrated circuit to another. For example the front-side bus (FSB) transports data between the CPU and the Memory Controller (and to other destinations). Buses may contain subgroups that are also buses, for example the "Memory Bus" which links the Memory Controller and the RAM contains an address bus, a data bus and a command bus.
- SIP - Single Inline Package - an obsolete type of memory module with a single row of (actual) pins along one side.
- SIMM - Single Inline Memory Module - an obsolete type of memory stick with power and data contacts on one side of the board. 30 pins.
- DRAM - Dynamic Random Access Memory - a generic term describing RAM in which the data needs to be refreshed continually. Very widely used in mass production PCs.
- SRAM - Static Random Access Memory - a generic term describing RAM in which the data is retained without the need to refresh. Faster, larger and more expensive than DRAM.
- Cache Memory - Cache is a term used to describe a number of different functions in the computer. Cache memory is a separate store of SRAM used by the CPU to store the most frequently used 'information'. The cache can be accessed more quickly than normal RAM so by storing frequently used functions/data there an overall speed increase can be obtained. There are different "levels" of cache depending on how close they are to the CPU, Level 1 cache is actually part of the CPU chip itself, Level 2 and Level 3 are external to the CPU usually on the motherboard.
- FP - Fast Page RAM - A type of DRAM, introduced in 1987, which allows multiple accesses to a memory location without the need to re-specify the address.
- EDO - Extended Data Output RAM - a type of DRAM which uses assumptions about the next memory access to pre-read data. Introduced in 1990 with approx 10% increase in speed over Fast Page. Sometimes known as Hyper Page Mode (HPM).
- DIMM - Dual Inline Memory Module - a memory stick with power and data contacts on both sides of the board.
- Parity - Parity is part of an error checking process that can be used to verify the integrity of data stored in RAM. The data is stored, as is always the case in computers, in binary - a sequence of eight ones and zeroes which make up the byte of data. The Parity of that data byte is found by determining whether there are an odd number or even number of ones in the data. The parity of each data byte can then be stored by adding an additional bit of data, which can be either a one or a zero. This extra bit of data is called the 'Parity Bit'. In the 'even parity' system if the total number of ones in the byte is an odd number the parity bit is set to one, thus evening up the number of ones. (There is also an 'odd parity' system which is the other way round just to confuse us all). When the data is read back into the system the computer again calculates the parity of the data byte and compares that to the parity bit that was stored with it. If the calculated and stored parities agree then all is well (usually) but if they disagree then there has been an error and the data byte is suspect. To use parity error checking the RAM must be able to store nine bits per byte of information.
- ECC - Error Correcting Code - RAM that has additional data storage for checksum bits to allow correction of errors 'on the fly'. The memory controller on the motherboard must support this function.
- SDRAM - Single data-rate Synchronous Dynamic Random Access Memory - Introduced in 1997, memory access is synchronised to the bus clock and the bus is 64 bits wide. 168 pin modules.
- RAMBUS - A revolutionary memory technology developed by Rambus Inc. based on a type of video memory and designed for use in PCs with Intel processors. Introduced in 1999.
- RIMM - Rambus Inline Memory Module - the memory stick used in systems using Rambus RAM. 184 pin modules.
- C-RIMM - The continuity module required to fill empty memory slots in the Rambus system.
- RDRAM - Rambus DRAM - originally designed to operate at bus speeds of up to 800MHz but only 16bits in width.
- DDR - Double Data Rate memory - a type of DRAM based on SDRAM technology that operates at twice the bus clock rate. It uses 184 pin modules. Released in 2000. This was the mainstream memory technology to the end of 2005.
- SODIMM and SORIMM - Small Outline versions of DIMM and RIMM sticks. These are smaller and thinner memory modules, typically used in laptops. Modules have 144 or 200 pins.
- SPD - Serial Presence Detect - circuitry (an EEPROM) built in to a RAM module which will send information to the BIOS and to the Memory Controller to inform it what type and how much memory is present, where it is and set up complex timing parameters.
- Heat Spreader - A thin metal cover making thermal contact with the memory chips and assisting in cooling. Also allows manufacturers to put large logos and badges on the memory modules.
- DDR2 - Double Data Rate2 memory - a type of DRAM based on DDR technology that operates at twice the clock rate. Released in 2004. This is expected to be the mainstream memory technology to the end of 2007. Not compatible with DDR motherboards. Modules have 240 pins.
- Dual Channel Memory - There is no difference between Dual Channel DDR Memory and ordinary DDR Memory, it's the motherboard that is different. Systems that have dual channel capabilities can effectively double the bandwidth of the Memory Bus by accessing the RAM modules in pairs. To use Dual Channelling you would purchase RAM in matched pairs and install it symmetrically across the memory channels.
- Virtual Memory - This is RAM that is simulated by the system when running out of space in the real memory modules, it is actually space on the Hard Drive and as such is far slower to access than real RAM. Significant degradation of system performance occurs if more than a certain percentage of current data resides in virtual memory.
- Latency - A delay interval. I was hoping to gloss over this but so many RAM companies quote latency figures it's bound to come up. See the section on Latency below.
- Bank - A group of memory chips (not modules) that together can supply enough data bits to equal the CPU data bus. In the days of 30 pin modules memory chips only held one bit per address and you could only fit 8 chips on a module so to "fill" the 486CPU's data bus (which was 32 bits wide), you needed four modules to make one bank. The introduction of 72 pin SIMMs meant the whole 32bits of data could be supplied by one module, but when the Pentium CPU was introduced with a 64bit data bus so you needed 2 SIMMs to make a bank. This explains why owners of older Pentium systems always had to add or upgrade their memory in pairs. With the introduction of the 168pin DIMM this drawback was overcome and now there can be many banks of RAM on one memory module.
- Rank - A row of memory chips. Usually a rank fills one side of a memory module so if your module has two ranks that means there are chips on both sides.
If I remember correctly the original SIMMs came in 256KB, 512KB and 1MB packages and cost a small fortune. In the days of Windows 95 a computer would commonly have several 4MB or 8MB memory modules. By the time Windows 98 came out these had become 16MB or 32MB modules to make up around 64MB in a good system. For Windows XP computers 128MB is a workable minimum depending on what applications you want to run, modules tend to be 128MB, 256MB or 512MB. Currently systems routinely ship with 512MB sticks and 1GB sticks are becoming more common.
RAM module sizes always double: 4MB, 8MB, 16MB, 32MB, 64MB, 128MB, 256MB, 512MB, 1GB, 2GB, etc. (since strictly speaking 1GB = 1024MB) You wont find any 96MB RAM modules for example, but your system may have an "unusual" amount of total RAM for a couple of reasons
- The system contains different sized RAM modules.
For example your system shows 192MB of RAM. Most likely this was a system that started life with 64MB of SDRAM and was upgraded by adding a 128MB module.
- The system has onboard video.
When a system has onboard video the video 'card' is integrated into the motherboard, but no video memory is provided, instead the system reserves part of the system RAM to act as video memory. How much memory is reserved depends on settings in the BIOS and is usually any standard size from 4MB to 64MB. The 'total' amount of RAM that Windows sees is then the size of the RAM module, less the amount reserved for video. This can result in some very odd-looking amounts for total system RAM. For example a system's total RAM may be reported as 352MB. This could be made up of one 128MB module plus one 256MB module less 32MB reserved for video.
The RAM in Intel based computers is accessed by the CPU via the front-side bus (FSB) and the memory bus. Improvements in technology have changed the speed of the FSB dramatically. Similarly the RAM itself has a maximum speed at which it can reliably operate and this must be at least as high as the memory bus speed. Clearly there is a 'grey area' where the definition of reliable operation is made and this is one difference between 'low quality' and 'high quality' RAM - the high quality RAM is likely to operate with close to 100% reliability significantly above the bus speed for which it is rated. This is one of the regions that overclockers exploit to boost their system performance - increasing the FSB speed to take advantage of the performance 'buffer zone' of good quality RAM.
Obsolete SIMM modules (EDO or FP) were rated by the response of the chips on the module e.g. 70 nanosecond. Older SDRAM sticks were rated as 66MHz, 100MHz (PC100) or 133MHz (PC133) speeds. Original DDR was rated at PC1600 or PC2100. Current DDR is rated as PC3200. Original RIMM modules were PC600, PC700 and PC800 speeds. Current RIMM modules are rated PC1066. Original DDR2 is designed for 400MHz, 533MHz and 667MHz speeds. Latest DDR2 is designed for 800MHz operating speed.
What does this mean in terms of quantity of data that could be transferred per second? Taking information from a variety of memory manufacturers sites we can make a table to show some comparisons of peak memory performance:
| Type of RAM | PC Rating | RAM Speed
in MHz | Peak Throughput
in MB/sec |
| SDRAM | PC100 | 100 | 800 |
| SDRAM | PC133 | 133 | 1100 |
| RIMM | PC800 | 400 | 1600 |
| RIMM | PC1066 | 533 | 2100 |
| DDR | PC1600 | 200 | 1600 |
| DDR | PC2100 | 266 | 2100 |
| DDR | PC2700 | 366 | 2700 |
| DDR | PC3200 | 400 | 3200 |
| Dual Channel RIMM | PC800 | 400 | 3200 |
| Dual Channel RIMM | PC1066 | 533 | 4200 |
| Dual Channel DDR2 | PC2-3200 | 400 | 6400 |
| Dual Channel DDR2 | PC2-4200 | 533 | 8400 |
| Dual Channel DDR2 | PC2-5300 | 667 | 10600 |
| Dual Channel DDR2 | PC2-6400 | 800 | 12800 |
Now we are getting technical... In the simplest terms Latency is delay. In a computer it is the inevitable pause between asking for some data and having that data available to be used. To give a real life example I looked at the Newegg site and found a couple of pairs of 1GB DDR PC3200 RAM modules which would look nice in my system, but am I better off ordering the OCZ Gold RAM with 2-3-3-8 timing or the Mushkin High-Performance RAM with 2-3-2-6 timing? What the heck do those numbers mean anyway?
I'll try to offer a simple explanation, but if all this terminology really makes your eyes glaze over then just remember if all else is equal then the lower the numbers are, the better the RAM will perform. Then skip to the next section. For the rest of us here goes:
Data is stored in your computer's memory chips in a similar way to storing data in a spreadsheet - it is organised in rows and columns and is sequential along a row. For example in a 16Mbit chip there would be 4,194,304 address locations or "cells" arranged in 2048 rows and 2048 columns. Each cell in the chip holds four bits of data. Part of the chip might look like this:
| Address | Column 1 | Column 2 | Column 3 | Column 4 |
| Row 1 | 1101 | 1001 | 0100 | 0110 |
| Row 2 | 1011 | 1000 | 1100 | 0000 |
| Row 3 | 1111 | 1010 | 0101 | 1100 |
| Row 4 | 1011 | 0011 | 1010 | 1100 |
Keep in mind the ones and zeroes are represented by voltage levels in the form of electrical charge in a capacitor in the real chip and that these are being refreshed repeatedly. To read the data in a particular cell in our 2048x2048 chip the computer needs to indicate which Row the data is in and then indicate the Column that holds the cell containing the required data. It does this by issuing (in binary) an "address" for the Row and then the Column using the same 11 bit address bus in each case (because it takes 11 bits to count up to 2048 in binary). For example to read the data in the green cell in the diagram the computer must first address Row 3 (highlighted in yellow) and after that address is fixed it addresses Column 2 (highlighted in blue). Can you see a delay here already?
Because everything is taking place at mind-boggling speed there has to be a 'pause' between issuing the Row address and issuing the Column address to allow the voltages to stabilise. If the pause is not long enough the Column address could be corrupted by voltage remaining from the Row address resulting in the wrong data being read. Both the Row address and the Column address are "latched" into the memory chip by signals called "strobes", so we have a Row Address Strobe (RAS) and a Column Address Strobe (CAS). The necessary delay between them is called the RAS-CAS delay or TRCD. All the delays referred to are measured in clock cycles rather than actual time intervals.
Once the cell data (1010) has been read the next four bits of data required are (usually) in the same Row but in the next Column along so only the Column address needs to be changed. Again there must be a delay while the previous address 'evaporates' and the new address voltages stabilise before the address can be latched. This delay is called the CAS Latency or CL.
Similarly, once all the required data in a row has been read a different row needs to be addressed. Since the contents of the cells have to be refreshed and this is done on a Row by Row basis there is another delay required called the RAS Precharge time or TRP.
The memory in your computer is not active all the time and during the (tiny) intervals of inactivity certain parts of the memory are shut down to help prevent the chips from overheating. This introduces a delay when they need to be activated again. This is called the "Active to Precharge" delay orTRAS.
Finally there is another delay that must be allowed for, which is the delay between the computer selecting a particular memory chip (as there will be many chips making up your RAM) and being able to issue a command to that chip. This is called the Command Rate and for some reason seems to be without an acronym.
So coming back to the real world and our examples from Newegg can you guess what the quoted "timing" numbers are? That's right - they are the delays or latencies we've just discussed. Here's how a typical timing specification might look:
2-3-2-6-1T
- The first number (2) is CL, the CAS Latency. This value has the most effect on system performance. It is usually 2, 2.5 or 3 for DDR memory.
- The second number (3) is TRCD, the RAS to CAS delay. Not as critical as CL, it is usually 2,3 or 4 for DDR memory.
- The third number (2) is TRP, the RAS Precharge delay. This value has similar effects to TRCD.
- The fourth number (6) is TRAS, the Active to Precharge delay. This value affects stability more than performance. Typically between 5 and 8 for DDR memory.
- The last figure (1T) is the Command Rate and is often omitted, as it is almost always 1T. For slow RAM it would be 2T. Strangely some overclockers get very good results by deliberately setting the Command Rate to 2T even with low latency RAM as it allows them more flexibility when tweaking the other latencies and bus speeds.
Note that the numbers are valid only for the rated clock speed and will also be quite different for different types of RAM.
The real life examples were 2-3-3-8 and 2-3-2-6 both of which are good for DDR at 400MHz, but I can now see that the Mushkin 2-3-2-6 RAM may be more stable under heavy load than the OCZ RAM. So I can check the price differential and consider whether that is likely to be an important factor for my computer usage.
These latencies and timing figures have to be entered in the BIOS when the RAM is installed - the reason you've probably never had to do this is they are programmed into the SPD EEPROM on the RAM module and the BIOS reads the values automatically (unless set to manual). If you have two RAM modules with different timing figures then the BIOS takes the highest figure (slowest setting) to work with. The timing figures are manufacturers recommendations for successful operation, there is no law which says the memory module will not work with different timing and this is fertile ground for overclockers to experiment. They switch the BIOS memory settings to Manual so the SPD is ignored and insert their own figures in the BIOS. I am NOT suggesting anyone attempt to do this, unless you know exactly what you are doing. You can destroy your RAM with inappropriate settings.
To properly identify your RAM you need to know the total memory size in Megabytes(MB), how many memory modules there are, the type of RAM you have, its speed and ideally its manufacturer. There are a number of different ways you can find some or all of this information.
 Total amount of RAM in the System
As an example let's use SpeedFan to check what RAM I have: Launching SpeedFan from its desktop icon reveals I have version 4.27 installed. The program takes a few seconds to gather information then settles down at the 'Readings' screen where it shows you fan speeds and component temperatures. Click on the 'Info' tab and click the 'Read info' button. This gathers information and displays it in the 'DIMM info' box. Scroll up and down to see all the information. As shown below SpeedFan tells me I have only one RAM stick (DIMM #0) and it is DDR, it does not store parity information, and the total size is 512MB. If I had more than one stick there would also be information for DIMM #1, DIMM #2, etc.
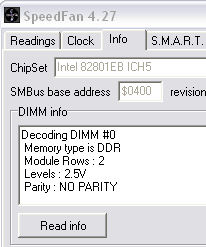 SpeedFan 'DIMM info' Box
Now let's have a look using Everest Home Edition: Start Everest, in the 'Menu' column on the left hand side click on 'Motherboard'. The right hand window should change to show CPU, CPUID, Motherboard, Memory, SPD, Chipset and BIOS icons. Click on the cryptically named 'SPD' icon (for an explanation see the SPD entry in the previous section). As shown below this reveals a wealth of information. The single entry for 'DIMM1' under device description shows I only have one memory stick. The details below show a serial number, date of manufacture, size (512MB), type (DDR SDRAM), speed (PC3200) and other information including the Manufacturer's name (Kingston Technology Company Inc.) and a link to their website. It incorrectly reports I have four DIMM slots when in fact my motherboard only has two. Note that Everest Home Edition is no longer under development and some of the information may be out of date.
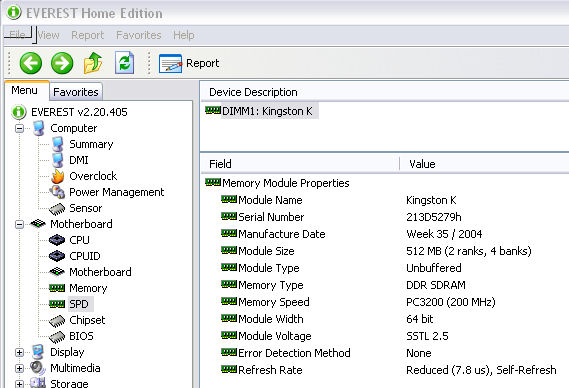 Everest Memory Module Properties
Additional information about the Memory Controller can be found in the 'Motherboard' window by clicking on 'Chipset' and highlighting 'North Bridge'. This will indicate for example whether the Memory Controller can support Dual Channelling, which you will need to consider if you are upgrading.
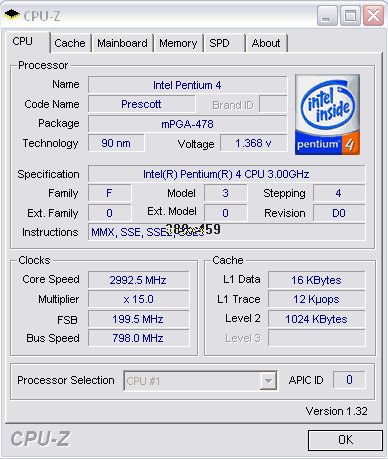
Finally let's check out our RAM using the freeware program CPU-Z. If you downloaded this from the address in the "Required Tools" section you will have a zip file somewhere in your computer. Extract the zip file to a directory called 'CPU-Z' or some name you can remember easily. That's all you need to do, there is no installation process. To run CPU-Z navigate to the CPU-Z folder and double click the cpuz.exe file. This will run the program and present you with a report window which looks like this:
 CPU-Z Opening Screen
We're interested in the RAM at present so click the 'Memory' tab. Here it tells me I have 512MB of DDR SDRAM on a single channel, running at 133MHz. It tells me the ratio of the FSB to the DRAM clock is 3:2 when I would have expected it to be 1:1 (I fixed this later - see under "Look in the BIOS" below). This tab also tells me the timing figures are 2-2-2-6 @133MHz. (See the 'Memory Latency' section for an explanation of these figures). Now click the 'SPD' tab.
Information for Slot #1 is displayed, a pull down menu lets you select slot #2, slot #3, etc., which in my case say "Empty". The rest of the display looks like this:
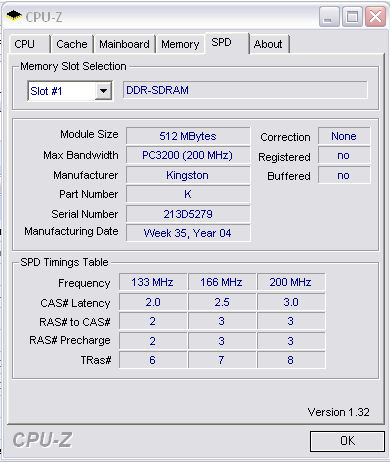 CPU-Z SPD Screen
Which shows me my Kingston Value RAM has some pretty ordinary latencies at 200MHz, but otherwise doesn't tell me anything new.
- Go to the Computer Manufacturer's Website
If you have a 'brand name' computer, most manufacturers websites allow you to search by model name or number and find detailed specifications of your system in its original condition. They often include FAQs and Support pages that will give you information about what memory is compatible and how to upgrade. Some of these are excellent and include videos of how to open your case and how to remove and/or add memory. Naturally they will usually only suggest their own brand name memory as an upgrade.
- Use an Online Configuration Tool
Major manufacturers and suppliers of RAM offer downloadable 'Memory Advisor' or 'Configurator' tools that can scan your computer, display the memory specifications and recommend a compatible upgrade. I'll take a look at some of these in the "How to Upgrade your RAM" section.
- Look in the BIOS
Consult your motherboard manual if you don't know how to enter the BIOS - on most systems you press the 'Del' key as the system starts to boot. There are many different formats for the BIOS screen so I cannot be accurate about what options you may see available. On my own system I have American Megatrends Inc. BIOS (AMIBIOS) and clicking on 'Standard BIOS Features' showed 'System Memory : 512MB' with no other information. Looking under 'Advanced BIOS Features' >> 'Advanced Chipset Settings' >> 'Northbridge Config' I found "DRAM Frequency : 266 MHz" which is a manual setting, overriding what is stored in the RAM modules SPD. I changed this setting to 'Auto' so the BIOS would read the SPD for the recommended value. After booting I ran CPU-Z again and the bus ratios had changed to 1:1 and the memory frequency was now 200MHz. (Notice there is some confusion over what frequencies are which. Because the RAM is Dual Data Rate the memory bus runs at 200MHz in this example but the equivalent DRAM Frequency would now be 400MHz.)
- Open the Case and Read the Labels
A quick look inside the computer will tell you how many RAM sticks you have already. If nothing else will give you concrete information then you can power off the system, observe static handling precautions (see below) and remove the RAM already in there. If you are lucky the RAM stick(s) will have a label giving you appropriate information about the size, speed, manufacturer and possibly some warranty information. Some manufacturers are more cryptic than others and may only give you a part number. Some will have no label at all in which case you would have to track down information on individual memory chips using the part numbers printed on them. Following that process is beyond the scope of this tutorial.
"640K should be enough for anybody." - Bill Gates 1981
Ironic that this quote should come from the founder of Microsoft - the company whose Windows operating system goes through computer resources like kids go through birthday cake. Users of Windows XP will quickly realise that it does not run properly on the minimum system requirements of 64MB RAM and many people recommend 512MB as a minimum for running even medium complexity applications. Budget systems are still being released with 128MB of RAM to run XP Home and those owners will soon be wanting to upgrade their memory to make their systems more responsive. So how much RAM is enough for anybody these days? Well there is lots of advice available on the Internet including detailed analyses covering different Operating Systems such as the 'Kingston Ultimate Memory Guide' (see references). There is also a lot of nonsense written about RAM requirements, for example one site said 512MB is adequate for a Windows XP system "if you only run one application at a time or if it's your grandmother's computer" - I'm guessing the author doesn't own a "PC" but instead owns a "Gaming Rig".
To cut a long story short you should look at the maximum RAM your system can accommodate, the maximum you can afford to spend on the upgrade and then aim to at least double what you have now. Assuming you're running Windows XP on a PC with 128MB then if you're an average user on a tight budget aim at adding 128MB or 256MB. If you're an average user that does some digital photography and some gaming look to have 512MB in your machine or if you do more complex stuff or play some serious games on your PC make that 1GB. If money is no object, make it 2GB and if you're a gaming freak... well you won't be reading this tutorial anyway.
Yes you can!
Windows 95 and Windows 98 (first edition) do not recognise more than 256MB of RAM - adding more than this can slow down your system markedly. There is however a fix for this detailed in an AumHa article - see the references section. If you have more than 1GB of RAM (though I can't imagine why you would) Windows may not start.
Windows 98SE and Windows ME have trouble with more than 512MB RAM - you may get "Out of Memory" errors or other symptoms.
- Windows 98SE and Windows ME will not run well with more than 1GB of RAM. This may cause "potential system instability" according to Microsoft.
- Some versions of the Award BIOS slow down your system markedly when more than 768MB of RAM is installed.
| No. of RAM Sticks | Size of Each Stick | RAM Type | RAM Speed | Latency | Preferred Brand | Series | Total Amount of RAM | Add or Replace? | Price |
| 2 (matched pair) | 1GB | DDR | PC3200 | 2-3-2-6-1T | xyz | Iridium | 2GB | Replace | $??? |
- A note on Dual Channelling
I have come across some contradictory information on Dual Channelling of RAM. Remember this is a function of the motherboard, not the RAM, but the RAM must be symmetrically placed on the two memory channels and it has to have "matching" characteristics. Exactly how they match is not clear. RAM manufacturers sell boxed pairs of matched RAM for dual channelling yet according to Intel the memory does not have to be the same brand, have the same latencies or even the same speed to dual channel. They also say you can dual channel using say two 256MB RAM sticks on channel A and one 512MB stick in channel B. In the end the motherboard "decides" whether the dual channelling will be implemented or not. If your computer has (like mine) one memory module in a dual channel system, then adding another module of the same size, and sensibly the same speed, should enable the system to dual channel, but it may not. If the modules are not sufficiently "matched" the system will continue to run with single channel access and most of the benefit of the upgrade would be lost.
 Matched Pair of DDR2 Modules *
Motherboard manufacturers try to make it easy for us to install the RAM by colouring the RAM slots differently for different channels. So you might have a motherboard with four slots, two of them blue and two of them green for example. Unfortunately some manufacturers use the colour to indicate which channel the slot belongs to while others use it to show which is the first slot on each channel. If you get it wrong you can still use all your RAM but you won't have the speed benefit of Dual Channelling. Check your motherboard manual for their recommendation for where to install the RAM modules. After installation use a utility like CPU-Z to check whether Dual Channelling is active or not.
- Install the New RAM
Once you have purchased and received your new RAM all that remains is to install it, which is probably the simplest part of the whole process. Do NOT take the new RAM out of its container until you have read the static precautions detailed below. It's probably best to open the RAM container after you have your computer powered down, the case opened and your static strap attached (if available). Just before inserting or removing any components pull the power cord out of the back of the computer and wait for at least 30 seconds so there is no chance of any voltages left inside the case to cause damage. Then all that is required is to unplug and remove the old RAM if it is being replaced. For modern DIMM slots pressing down on the plastic latches at the ends of the RAM slots will eject the RAM module. Older systems may have less user-friendly mechanisms, but all of them use a mechanical latch at either end of the module. To remove the module you must disengage the latch, do NOT try to just lever the RAM module out.
Inserting the new RAM is a matter of choosing which slots to use (if your are not using Dual Channelling then just use the next available slot). Hold the module close to and centred on the slot and check the notch in the RAM module lines up with the "key" in the slot to make sure you have the module the right way around.
 RAM slots showing the key (arrowed)
Then press down (towards the motherboard) on the latches at either end of the vacant slot to put them in the 'open' position. Insert the module in the slot with the gold contacts towards the slot, double check it's the right way round, then push it firmly down into the slot using firm thumb pressure equally on each end of the module. If all is well the latches will pop up to lock the module in place. Do the same thing for any other RAM modules to install and you're done.
Put any removed modules in the RAM container, take off your static strap, close the computer case and reconnect the power. The system is ready to go.
When handling RAM, as with other computer components, care needs to be taken to avoid damaging the component through the discharge of static electricity that builds up on your body or clothing. Static is especially a problem during dry weather and if you have synthetic carpets or clothing. For example a synthetic pullover (sweater) would be a bad choice of garment to wear while upgrading memory, a short-sleeved cotton shirt would be a much better choice. The best way to combat static while working inside your computer is to wear a static strap attached to the chassis and worn on your wrist during the whole process. Disposable static straps are available for a few dollars; professional versions may cost $30-40. Alternatively if you can maintain good contact between yourself and the metal chassis for most of the process and try not to move around too much then that may be adequate without a strap.
 Professional Static Strap
I hope this tutorial has informed you of some of the different types of RAM found in computer systems, explained some of the intricacies of RAM timing, shown you how to identify the RAM in your own computer and helped you to choose the correct quantity and type of RAM when upgrading.


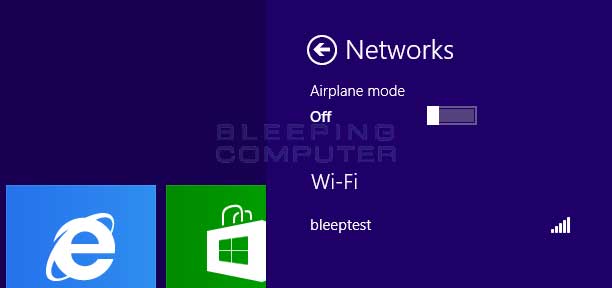
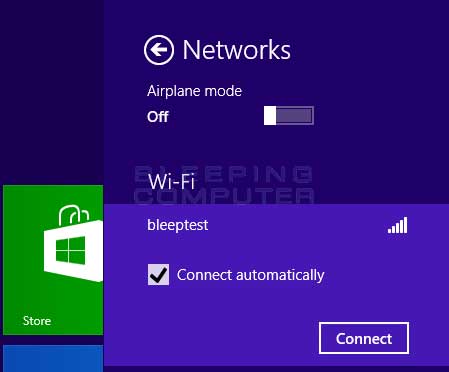

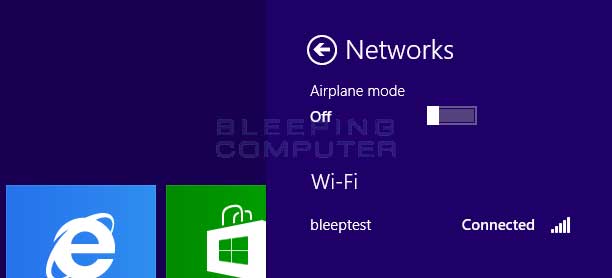

 , with the lower the level being the worst connection speed.